ShopDreamUp AI ArtDreamUp
Deviation Actions


Suggested Deviants


Suggested Collections


You Might Like…


Description
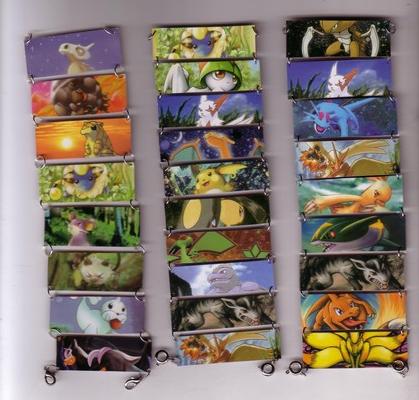
Pokemon Bracelets
Originally Submitted August 21 2007
Inspired by a Fashion Class project: To create a piece of jewellery out of found objects.
This idea came to me in a dream one morning xD
To Create The Bracelet Yourself:
You will need a variety of Materials!
1. Pokemon Cards, 10 or 11 at most
2. A Marker/Pen
3. Some Jumper/Connecter rings (You can find these in the craft sections of local Walmarts, Zellars, or whatever) You'll need two for each pokemon card you need plus 2
4. Claw Hooks (Or any other type of connecter that closes and opens). You'll need two
5. A Pair of Pliers
6. Scissors
7. Newspaper
8. A Thumbtack
9. A Ruler
10. Tape....Preferably Irish Tape.
...If you're too lazy/not willing to read bad instructions by me, that's fine, cause I have a youtube video up of how to make it xD
[link]
Gather all the cards you want to use. Decide how thick you want your Pokemon card slits to be: 1cm, 0.015m, 0.000013Km,1/2 in, etc. The size of the slits will vary the size of the bracelet. The bigger the size is, the less slits you need in your bracelet and you get to see more of the card image. The smaller the size, the more card slits you'll need, and you'll see less of your card image. Decide your measurements and mark it with your ruler along the width of the Pokemon Card. Draw two horizontal lines from where you marked your measurements to the other side of the card. This is the slit you'll cut out and will be what you see on your bracelet. You do this for all the cards you want in your bracelet.
Note: You don't have to cut horizontally every time. Some card images are angled differantly....Your more than welcome to cut diagonally, but the width of the card slit you cut out will be longer than the others. If you do this, make sure to adjust the size later.
Also Note: The newer series cards have wider frames than the older series cards.
When you're finished, you should have a bunch of cute little card slits. If some are larger than others, your more than welcome to trim them down to the smallest card slit you have. However, unless the slit is grossly different than the others, you won't notice a couple millimetres difference.
Next, it's time to take your newspaper (About 10-15 sheets should do) and fold it over a couple times so you have a nice pad of paper. Feel free to tape this down so it doesn't pop up on you while you're working. Place a pokemon card slit onto the pad of paper and take your thumbtack and poke four holes through it, one in each corner. Be warned that this process is virtually the most risky part of the entire making of the bracelet. Your more than welcome to mark a dot in the corner of the slit to indicate where your going to poke your hole. Also, don't make the hole TOO close to the corner. It will be easier for it to tear. At the same time, don't stray too far from the corner. It it wise to practise this on a few common cards (Cough GEODUDE Cough) before actually starting this process.
If your thumb is not fractured by the end of this step, you can move onto the next, looping the connecter rings through the holes. (First, you might want to order the layout of your card slits). You take your pilers and open all the connecter rings you need. You don't need to open them a lot, just a little gap with do. Then you take your first card slit and loop a ring through one of the holes in the corner. You take the second card and loop the opposite hole on the same side of the card into the ring. For example. If you loop a ring through Slit A's BOTTEM Right hole, You will loop the SAME ring through Slit B's TOP right hole. If you do this correctly, the slits should been facing it's same side when you close the two slits together. Close the connecter rings with your pliers when your sure everything is lined up. Keep repeating this step until all the slits are lined up in a single row, forming your bracelet. As you loop each slit together, keep unfolding the bracelet to make sure the sides you want are facing up and are all facing the right way.
Note: Be sure to wrap your bracelet around your wrist so it fits appropriately. Again, it depends on the length of the card slits to deiced how many slits are needed to fit around your wrist.
Make sure you have connecter rings at the end of each ending slit. There should be four, two on each end that don't connect anywhere. Pick an end, and connect the connecter rings to your hook claw, or any other closing/opening object you have.
And now you should have a complete Pokemon Card Bracelet!
One weakness in the bracelet I find is that it is vunerable to rain or sweat. If you wish, you are more than welcome to laminate the cards before you start cutting them up. Or you could use large clear tape, tape the WHOLE pokemon card picture (Just the picture, not the entire card) and THEN cut out your slit. If you simply try to laminate the slit, it can result in unwanted crinkles and bubbles. Again, try this on a few common cards before you do anything to your favorite cards.
Another weakness I find is the face of trying to get these bracelets ON! You might need someone to help you with putting it on and taking it off
So to all you Pokemon lovers out there with a plethora of Pokemon cards just sitting in some binder, or some box, or simply spread across your bedroom floor, gather them up, and make a bracelet out of them!!
You don't even have to use Pokemon cards. You can use Digimon cards, Magic cards, Yu-gi-oh cards, Sailor Moon cards, Credit cards, ANYTHING!! However, these cards can vary. I find Yu-gi-oh and Magic cards to be rather thin...And some of the images on these cards can be DRASTICALLY differant from that of Pokemon, so be sure to take these things into consideration!
Remember!! Common cards are the best test subject cards!! Experiment on those lousy Geodudes or those rubbish Magikarps!!
Image size
419x400px 34.9 KB
© 2008 - 2024 Shydrake
Comments22
Join the community to add your comment. Already a deviant? Log In
This is beautiful